Do you have a set of contact data that is outside your CiviCRM database, which you need to get into your CiviCRM database?
In this how-to guide, we'll go through the process of importing a set of contacts into CiviCRM. You can use CiviCRM's import functionality to add new contacts to your system, add or update details on contacts that you already have in your CiviCRM database, or do both at the same time!
Click here for the official CiviCRM documentation on contact imports.
In addition to the contact import, CiviCRM also gives you separate processes for importing contributions, memberships, activities, and event registrations. If you need to add/update contact data and import other kinds of data, you'll want to do an import in two steps. Do the contact import first, to create any new contacts that aren't already in CiviCRM and fill in or update contact info on everyone else. Then you can run another import to add memberships (or contributions or activities or registrations) to your newly-updated CiviCRM contacts.
You can find help setting up your spreadsheet in Part 1.
Once your spreadsheet is set up, you're ready to start importing! In CiviCRM, navigate to Contacts (from the top menu bar) and then to Import Contacts.
Step 1: Choose Data Source
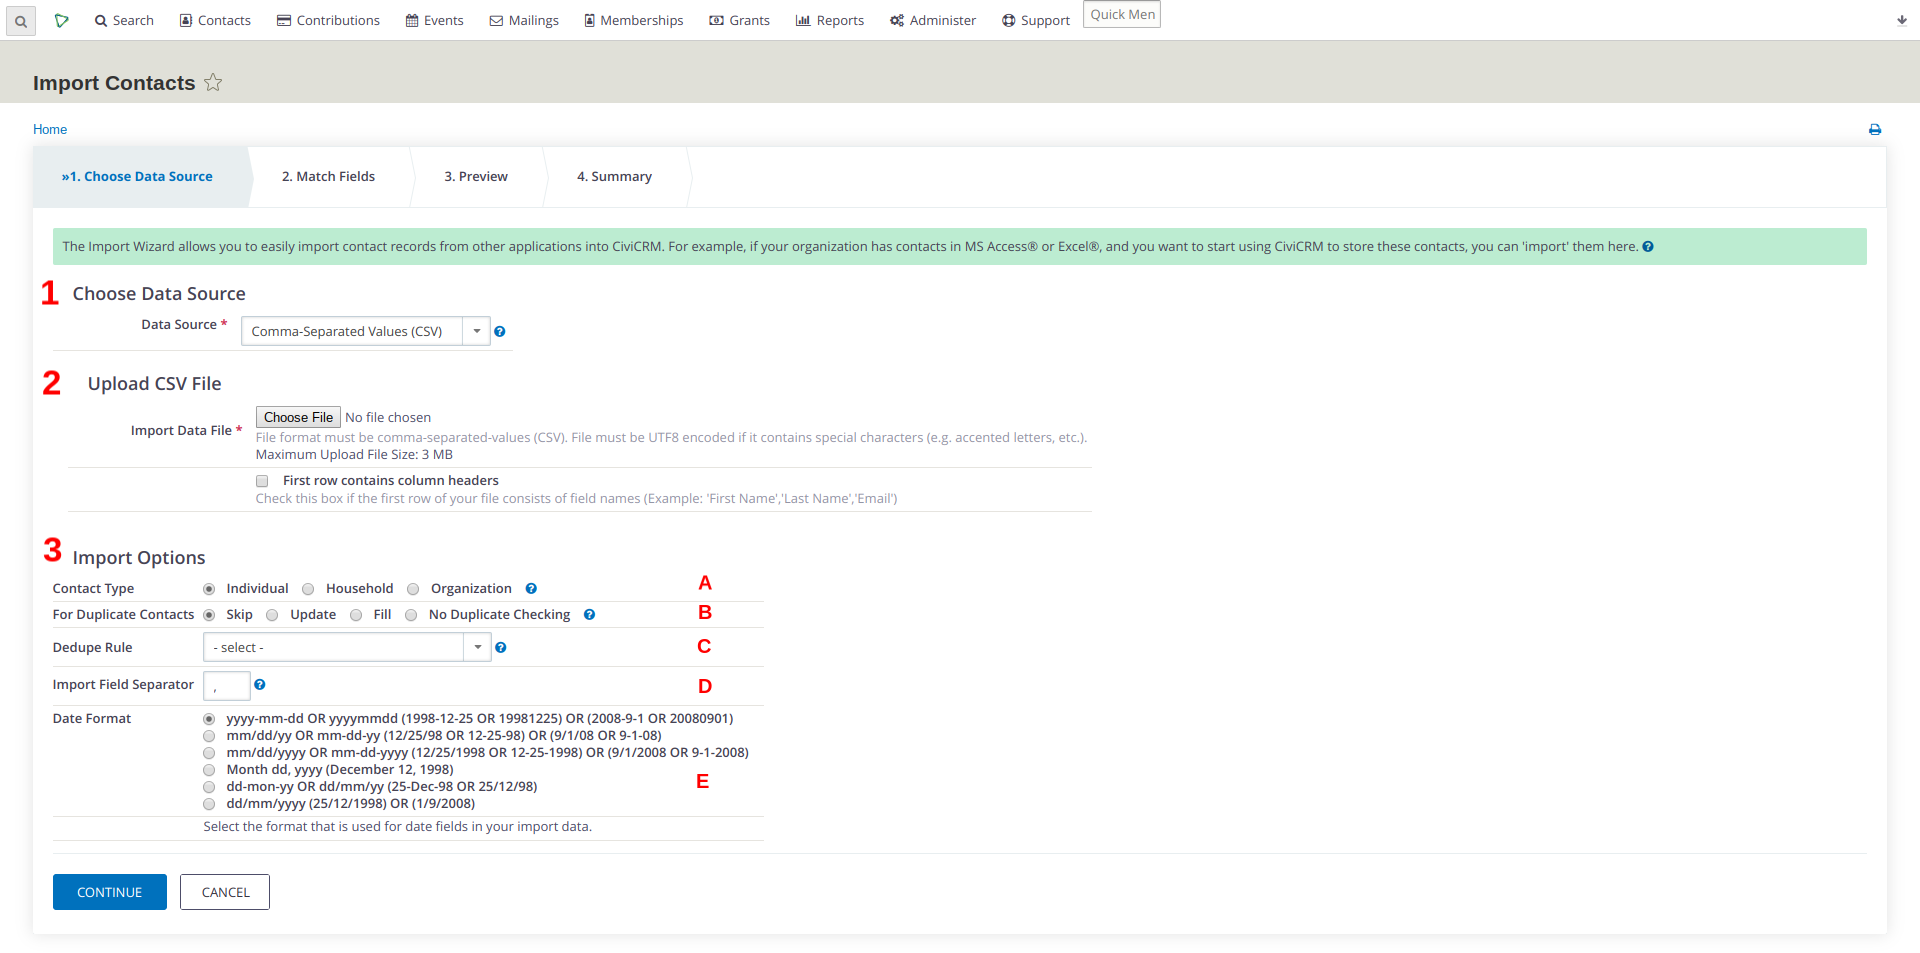
1. Choose Data Source
This question is an easy one! Leave it on the default selection, "Comma-Separated Values (CSV)."
2. Upload CSV File
Upload the CSV file you produced at the end of Part 1.
There's a checkbox here labeled "First row contains column headers." In Part 1, we created a spreadsheet with column labels (headers) in row 1. If that's what you did, that's perfect! Go ahead and check this checkbox.
3. Import Options
A. Contact Type
Select whether you're importing Individuals, Households, or Organizations. If you have more than one type of contacts to import, you created separate spreadsheets in Part 1. Now you'll go through this import process, from start to finish, for each spreadsheet. Upload your first one and select the types of contacts that your first spreadsheet contains.
B. For Duplicate Contacts
Choose very carefully here! These options tell the importer what to do when it comes across a contact in your import that matches a contact already in your CiviCRM database.
- Skip will skip over any contacts that are already in CiviCRM. In other words, if the importer finds a match for a contact in CiviCRM, it will ignore that row of your spreadsheet completely.
- Update will edit your CiviCRM data based on the data in your import file. Choose this if you are confident that all the contact details in your spreadsheet are more accurate than the corresponding contact details in CiviCRM, because this option will overwrite your CiviCRM data. It will not stop and ask you before it does this.
- Fill is probably the safest and most all-purpose option. If the importer finds a matching contact in CiviCRM, it will only add contact details from your spreadsheet if those fields in CiviCRM are empty or blank. It will not overwrite any details that are already filled in; it assumes your CiviCRM data is accurate and leaves those fields alone.
- No Duplicate Checking will do what it says: it will just add all the rows in your spreadsheet as new contacts in CiviCRM, without checking to see if they're already in there. Choose this if you know your import should just add new contacts, and you don't want the importer to even try and look for matches.
C. Dedupe Rule
Dedupe Rule selects which pre-existing CiviCRM Duplicate Matching Rule will be used to look for matching contacts. This rule defines what the importer will see as a "match" between your spreadsheet and existing contacts in CiviCRM. Each "match" it finds, based on this rule, will be handled according to whatever you selected in the previous field, "For Duplicate Contacts," above.
Select a rule that uses fields that you have in your import file. (If your spreadsheet doesn't have email addresses, there's no use selecting the "Email" rule here!)
Important: select a rule that you're confident won't generate any false matches, especially if you selected "Fill" or "Update" in the previous question. Otherwise your import could update one contact record with someone else's details.
D. Import Field Separator
Leave this field alone. We created a CSV in Part 1, and CSVs use commas (that's what the C stands for!) so a comma is the right answer here.
E. Date Format
If your import includes any date fields, select your spreadsheet's date format here. In practice, I've forgotten to change this value plenty of times, and the importer manages to figure out date values just fine anyway.
Step 2: Match Fields

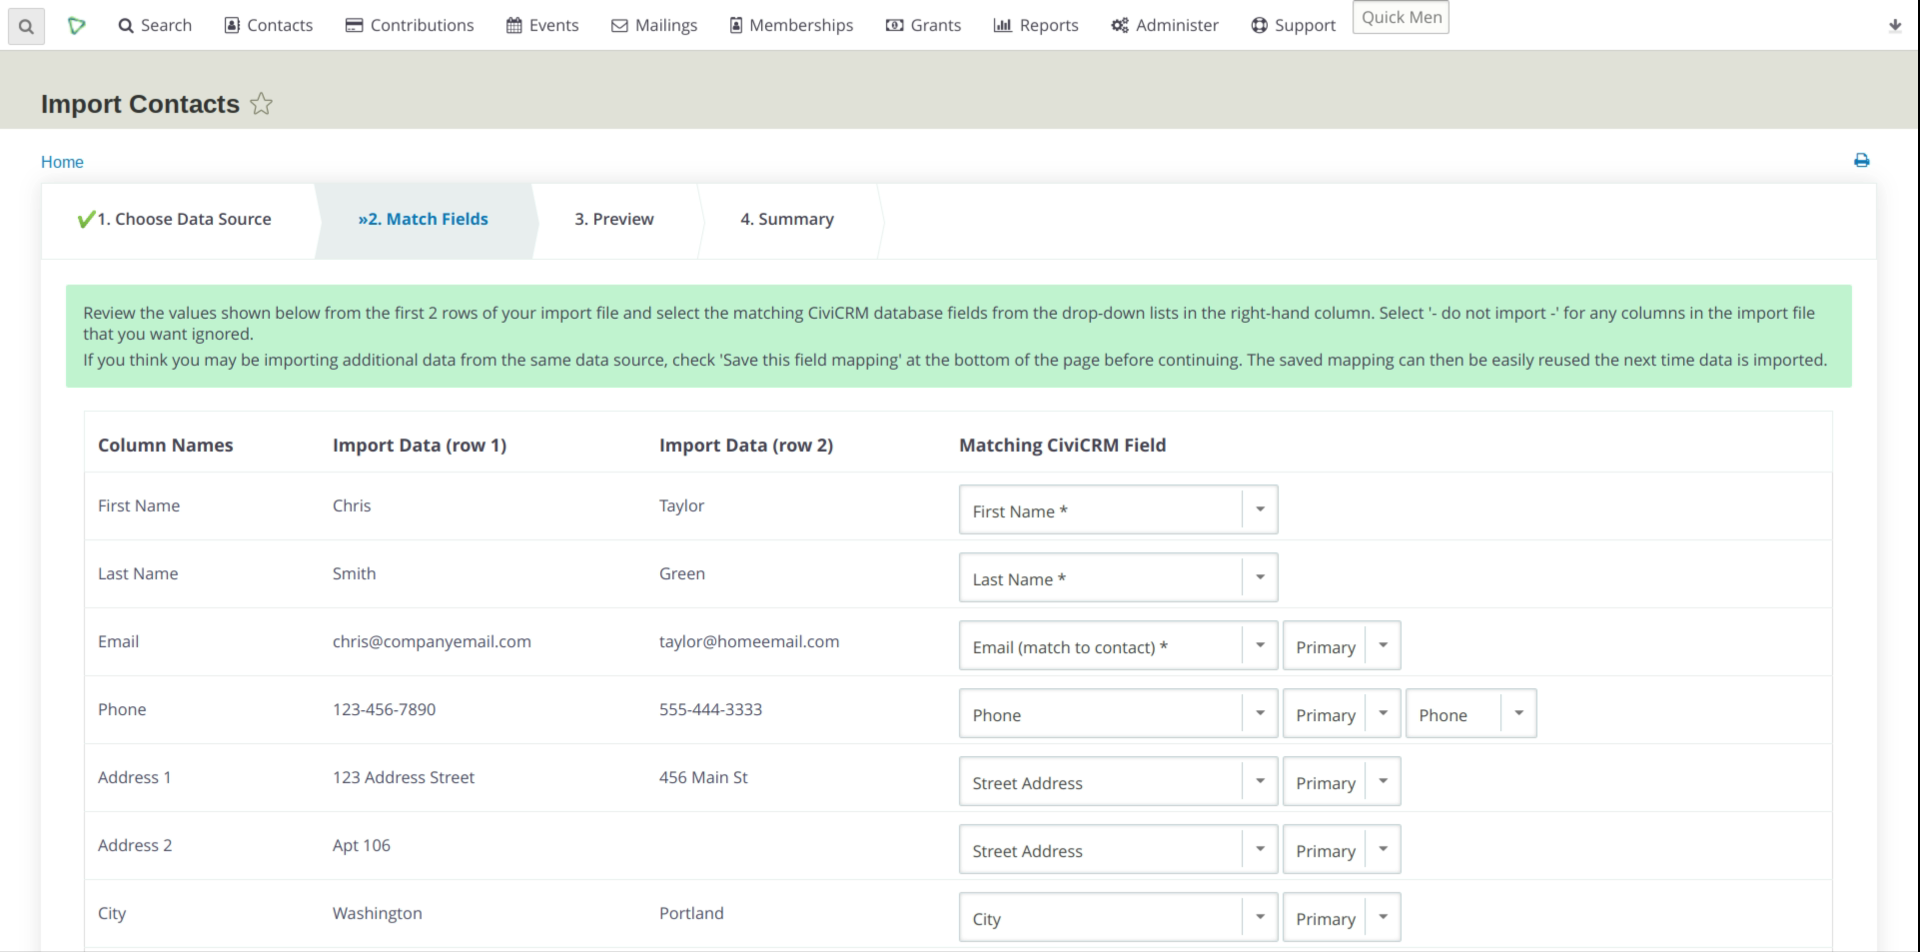
Here's where you tell the importer which of your spreadsheet columns go with which CiviCRM contact fields.
This page has columns, and they relate to your spreadsheet which also has columns, but the layout is different. This might get a little confusing, but let's jump in anyway:
- The first column here, "Column Names," is a list of the column names from your spreadsheet. It starts with the label/header you had at the top of spreadsheet column A, then the one for column B, and so on. It's sort of as if the top row of your spreadsheet has been turned sideways, and now runs down the left side of this page.
- The next two columns also relate to the next two rows from your spreadsheet. Look beneath the headings "Import Data (row 1)" and "Import Data (row 2)" and you'll see some familiar-looking data.
- At this point, if you're lost, take a minute to get re-oriented. Pull up your import file in spreadsheet form. Look at the spreadsheet, and then look at your Match Fields page, and then just keep looking at them both until you see what's going on here.
- Good? Good! Because the final column on this page is "Matching CiviCRM field" and it consists of some drop-down boxes. That's what we'll work through on this page.
Matching CiviCRM Fields
In these drop-down boxes, you will select the CiviCRM fields that go with each column of your import file. There are a lot of fields to choose from! The good news is that they're in alphabetical order.
If you're working with fields like address, phone, email, or website: you'll need to select the corresponding Location and/or Type. See the screenshot above, where each of these fields is followed by a second and sometimes a third field for Location and Type.
Most of these field names are self-explanatory and you'll recognize them from your usual work with contacts in CiviCRM. If you find yourself unsure about which field to choose, one way to figure it out is to run an export of some existing contacts from CiviCRM. Choose the "Select fields for export" option, and select the same fields for export that you're unsure about for your import. Your export will show you, for existing CiviCRM contacts, which data is stored in which fields.
Be careful with the fields that are pre-selected for you on this page. The importer will make some guesses about your spreadsheet, but you should not assume its guesses are correct! Check out the screenshot above: the importer has guessed the "Street Address" field for both my "Address 1" and "Address 2" data. This will save only my Address 2 data in the "Street Address" field in CiviCRM. What I actually want for Address 2 is the CiviCRM Field "Supplemental Address 1."
For any spreadsheet columns you don't want to import at all, select "- do not import -". It's the first option in the drop-down list.
Save Field Mapping
Finally, at the bottom of this page there's a checkbox labeled "Save this field mapping." Since this is your first import, honestly, it's really likely something will go wrong. Check this checkbox and enter a name for this field mapping. Now if you have to redo the import process, at least you won't have to redo this page from scratch. (From now on, you'll have an option to "use saved field mapping" on the first page.)
Step 3: Preview
There's much less to do on this page. It's mostly the same as the previous page, but with your drop-down selections displayed back at you. If this all looks fine, there are still two things you should definitely do here:
- Look at the Total Rows reported at the top of the page. Does it match the number of rows in your spreadsheet (minus your top row, which is column labels)? If this number is off, there's something funny going on. Do not proceed until you figure out what it is.
- Scroll to the bottom and expand the section labeled Create a new tag and assign it to imported records. Always tag the records you add/edit during an import. It makes them easy to find and review when you're finished. Give your tag a name like "Import" followed by today's date, i.e., "Import 03-31-2020." If you don't want these contacts tagged like this forever, you can always delete the tag after you're sure the import has worked perfectly.
At this point the importer has just run a preliminary check of your data file. If it spots any errors, it will tell you about them in a message at the top of the page. For more information and help with errors, check out Part 3: Dealing with Errors.
Hit Continue when you're ready. You'll get a pop-up dialog warning you to have a backup of your database. This is a very good idea, the details of which are outside the scope of this particular how-to guide.
Step 4: Summary
This screen either tells you your import has completed succcessfully, or that your import has completed with errors. If there are errors, you'll get some details about them. See Part 3 for a guide to dealing with errors.
