Google Analytics (GA) is the 800-pound gorilla of digital analytics software. Once you add the code to your website it can track metrics related to your website traffic such as the number of visitors, what part of the world the users are located, what devices are used to visit your site, the most popular pages visited, and much much more. It's also absolutely FREE! It's no wonder why GA is the most popular analytics tool. However, there is one aspect of the tool that can skew your tracking metrics.
When tracking new vs. returning visitors, “returning visitors” can sometimes be defined as “new visitors.” When a user visits your website, a cookie stores a unique client ID. If the user has more than one session with the same client ID then they are counted as a returning visitor. This works great if the user visits the site using the same device and browser, but that is no longer the case. The same users may visit your site from their computer, smart phone, or tablet. Each time they visit the site with a new device, the cookie assigns a new client ID and logs them as a new visitor. However, there is a new Google Analytics feature called the User-ID reports that unifies sessions across multiple devices for users logged into your website.
In this article we will teach you how to implement the User-ID feature in your Drupal website using Google Tag Manager (GTM). Google Tag Manager is a free supplemental tool that allows you to get very granular with your tracking metrics and send that information to Google Analytics. Once installed on your website you can use the GTM user interface to add snippets of code to your site. This tool has become increasingly popular amongst marketing teams because it allows you to deploy code snippets without the need of a developer.
Drupal Implementation
Google Analytics Setup
If you have an existing Google Account, then you can already access the analytics and tag manager tools. If you don’t have a Google Account, you can create one for free.
-
First, setup your Google Analytics account.
-
This is not to be confused with your Google Account. GA accounts allow you to organize and separate data. For example, a marketing agency may create different accounts for each of their clients.
-
-
After creating your analytics account, a “property” and “view” are created
-
Properties are generally used for different website domains
-
Views allow you to segment, filter, and create new versions of your analytics reports
-
-
Once inside your analytics account, click on the Admin button (the gear icon)
-
In the Property column, expand the Tracking Info section
-
Click User-ID

-
Accept the terms and on the second page, be sure Session Unification is toggled on
-
Follow the steps to create the View
-
Now we will create a custom dimension. Custom dimensions allow you to capture non-standard data in your GA accounts
-
Navigate back to the admin area of your account
-
In the Property column, expand the Custom Definitions section
-
Click Custom Dimensions
-
Click the button to create a new custom dimension
-
In the Name field enter UserUid
-
Set the Scope to User
-
Save the dimension
-

-
Back in the Admin section, under the Property column, click Property Settings
-
Make a note of the Tracking ID. Ex: UA-000000-2
Google Tag Manager Setup
-
After creating a new account a Container will be created automatically
-
If you have multiple website environments (ie: Dev and Staging) then we recommend creating different containers for each environment. Follow the steps above to create additional containers
-
-
Set up a tag to deploy your Google Analytics tracking code
-
Create a new tag. Click Tag, then New.
-
Then select the Universal Analytics option
-
For track type, select Page View.
-
Check the Enable overriding setting in this tag checkbox
-
Enter your Google Analytics tracking ID
-
In the Triggering section select All Pages
-
Save the Tag
-

-
Setup a User-Defined Variable
-
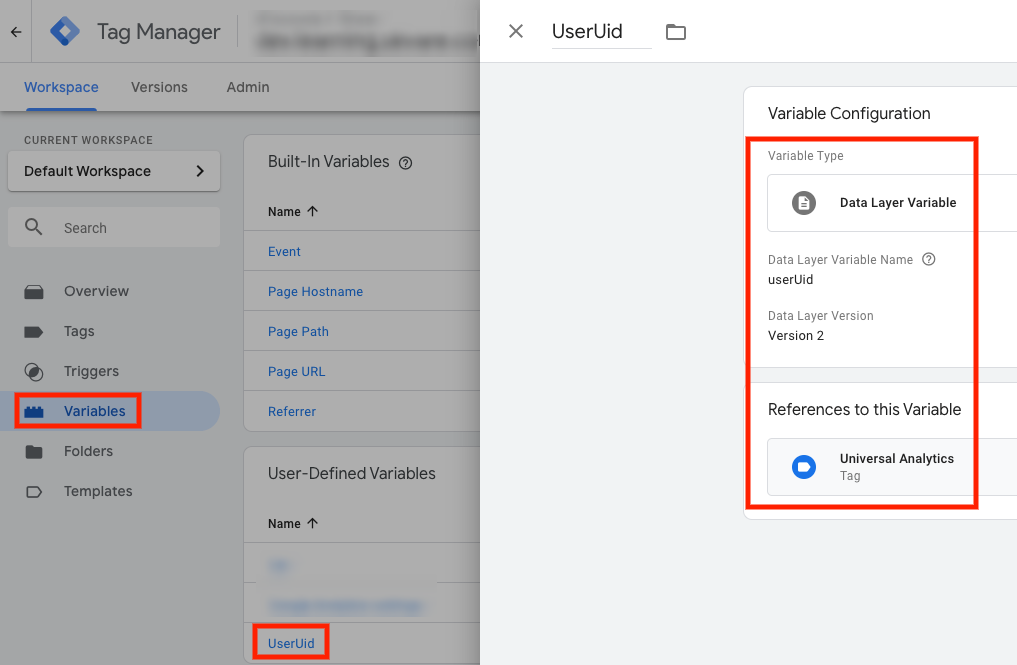
Click the Variables tab in the left sidebar
-
Click the New button
-
In the Variable Configuration section, choose Data Layer Variable
-
For the Data Layer Variable Name, enter userUid
-
Save the variable
-

-
Create a custom dimension and field in the Universal Analytics tag in GTM
-
Navigate to the Tags section
-
Click your Universal Analytics tag to edit it
-
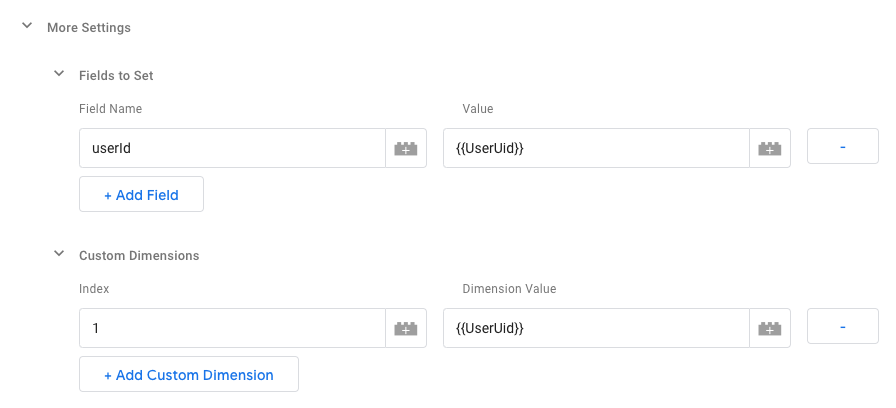
Expand the More settings accordion
-
Expand Fields to set
-
In the field label, enter userId
-
In value, enter {{userUid}} (this corresponds with the variable you set above)
-
-
Expand custom dimension
-
Enter 1 in the Index field (this means it’s our first custom dimension in GA)
-
Enter {{userUid}} (this again matches our custom variable)
-
-

Configuring the Google Tag Manager Drupal Module
-
Install the Google Tag Manager module
-
Go to the module configuration
-
Enter your GTM Container ID (You can find this in the top right corner of your GTM account)

-
Install the dataLayer module
-
This module makes the UserUid available in the dataLayer (no module configuration needed)
Testing Google Tag Manager & Deployment
-
In your Google Tag Manager workspace, click the Preview button in the top right corner
-
Navigate to your website where you installed and configured the GTM Drupal module
-
You should see a popup in the bottom of the browser where your dev tools usually appear
-
With preview mode you can see which tags are firing on a page as well as the information in the dataLayer
-
If everything is working as expected, you can publish the GTM changes
-
Go to the Tag Manager workspace
-
Click the Submit button in the right corner
-
Make sure “Publish and Create Version tab is selected
-
Enter a version name and description. This is technically optional, but we highly recommend them. It can be helpful later.
-
Click the Publish button in the top right corner
-
In the Versions tab, you can see a list of versions and their names. You can also see which versions are the latest and live. You can also roll back to previous versions if needed
How to use the new report
Using User-ID reports
Once signed in to GA, you will see two Views in the Analytics property. All Website Data contains all unfiltered website data. The User-ID Report View contains information from the unified user sessions. In most cases, you will use the User-ID Report.
Adding secondary dimensions to reports
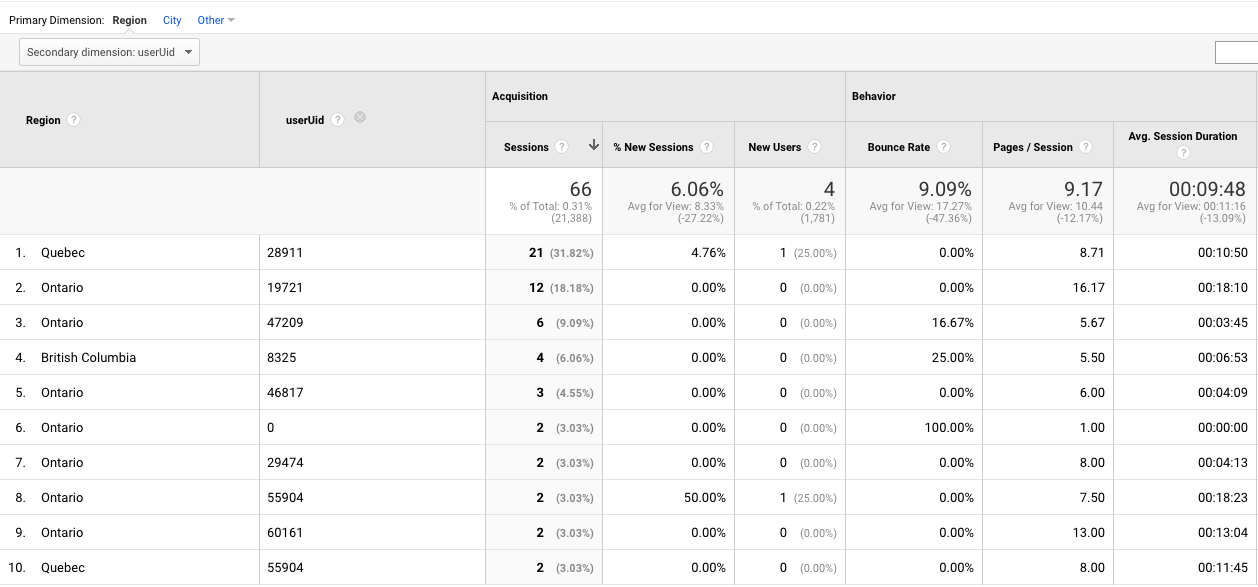
You can add the userUid secondary dimension to almost any report to reveal the Drupal user id of the user.
For example, you want to know which users accessed the site from Canada:
-
Go to Audience > Geo > Location
-
Click on Canada to drill down
-
Click into the secondary dimension dropdown (below the graph on the left side)
-
Start typing userUid when the autocomplete suggestion appears, click to set it. You should now see the user ids in the second column of the report.

Conclusion
With more and more users using multiple devices to visit your site, the User-ID report lets you associate an ID for a single user. Google Analytics then interprets each user ID as a separate user, which provides a more accurate user count in your reports. These unified sessions give you a more in-depth look and tell the actual story of your users' engagement with your site as they browse from computer to mobile device to tablet.
If you have any questions or need help implementing these reports, please contact Skvare.