There are two powerful modules used in the Drupal world for creating fast custom searches. Search API is a framework which provides an interface for site builders to create custom searches on any entity known to Drupal. It supports several search backends, including Apache Solr and native database search. It has a flexible API so developers can easily extend, customize, and alter aspects of the search process. Many additional contrib modules are available. Using these techniques, searching millions of records becomes fast and efficient.
The Facet API module allows site builders to easily create and manage faceted search interfaces. In addition to the UI components that standard, themers and module developers can build their own widgets, or alter the out-of-the-box widgets.
This one-two punch of powerful modules brings extremely powerful, flexible, and as you will see, easy to use custom search functionality to Drupal. Oftentimes all that is required is configuration through the admin interface, although the development API is extensive and the imagination is the limit for what can be done.
Creating custom searches for CiviCRM has always been a developer task, and the facilities are limited from both a site builder and a developer perspective. Wouldn't it be great to use Drupal's powerful search modules with CiviCRM data? Well folks, you can, with a little help from CiviCRM Entity.
CiviCRM Entity is a Drupal module which exposes many CiviCRM entities as true Drupal entities. That means that almost any module that can use Drupal entities, can access and manipulate CiviCRM data, Drupal style. This includes many commonly used modules such as Views, Rules, Entity Reference, Entityqueue, and many more.
Create a Custom Search and Display
In this article I'll outline the basic instructions and methods that can be used create custom searches on nearly 20 different CiviCRM entities. As an example, we'll build a custom Contact search, with a faceted block interface for Contact Type. This is the simplest example of what can be done. There are tons of options and configurations -- too many to outline fully in one blog article.
We'll be using native database search indexing in this article, but this methods applies to Apache Solr as well as several other available backend service classes.
The interface for the search will be created using blocks and a view, which will integrate into your theme. If your theme is responsive, then your custom search will be, too!
Step-by-Step
- Install and Configure System Requirements
- Create Search Server Instance
- Create a Contact Search Index Instance
- Select Fields to Index
- Configure Filters
- Facets
- Index the Contacts
- Create the Search View
- Configure View fields and Filters
- Contact Type Facet Block
- The Results
1. System Requirements
Drupal 7 and CiviCRM 4.4 or higher
I'm using the preloaded example CiviCRM data (optional).
Install the following modules and their dependencies:
- CiviCRM Entity
- Search API
- CiviCRM Entity Search API (submodule that comes with CiviCRM Entity)
- Search views and Search facets, submodules of Search API
- Search API DB (Database Search), this is the native database service class extension module
- Facet API
- Current Search Blocks, submodule of Facet API
2. Create Search Server Instance
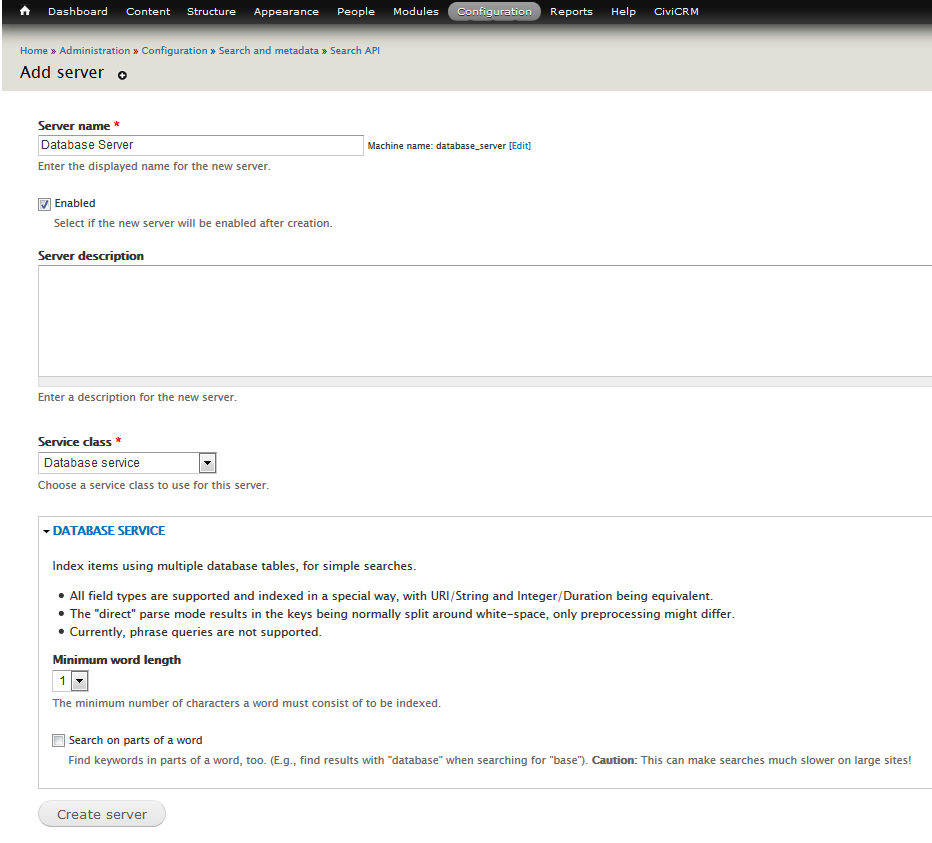
First navigate to <site_root>/admin/config/search/search_api/add_server to create a search server instance.
Enter a name for the "Server name", in this example I'm calling it "Database Server". Make sure the enabled checkbox is checked.
Next choose a value for the "Service Class" field. The option "Database service" will be available by installing the Search API DB (Database Search) module.
There are a couple optional settings including "Minimum word length", and "Search on parts of a word" provided by the Database service class.
3. Create a Contact Search Index Instance
For every entity that you want indexed, you'll need an index instance. You can have multiple instances per entity if you want multiple searches configured differently.
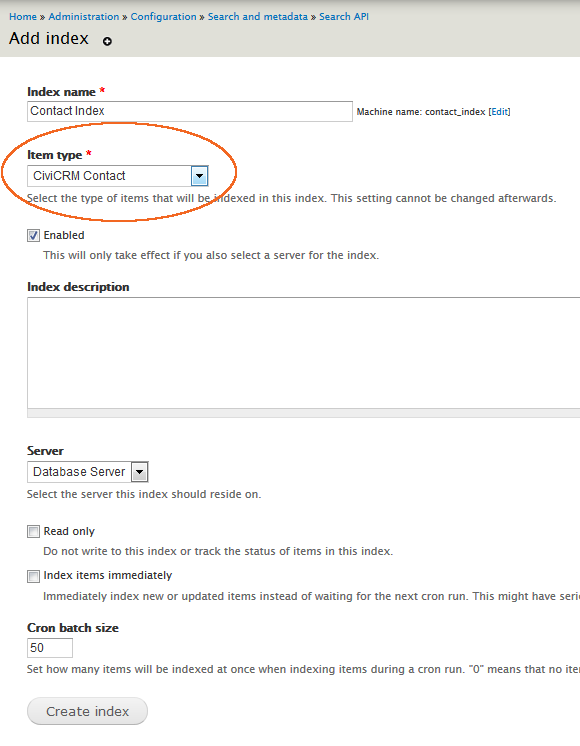
Navigate to <site_root>/admin/config/search/search_api/add_index
Enter a name for the "Index name" field.
Choose the entity type for the "Item type" field. In this case I'm using CiviCRM Contact, because I want to index all contacts. Make sure the Enabled checkbox is checked.
For the "Server" field, make sure you select the server instance you created in the previous step.
Click the Create index button.
4. Select Fields to Index
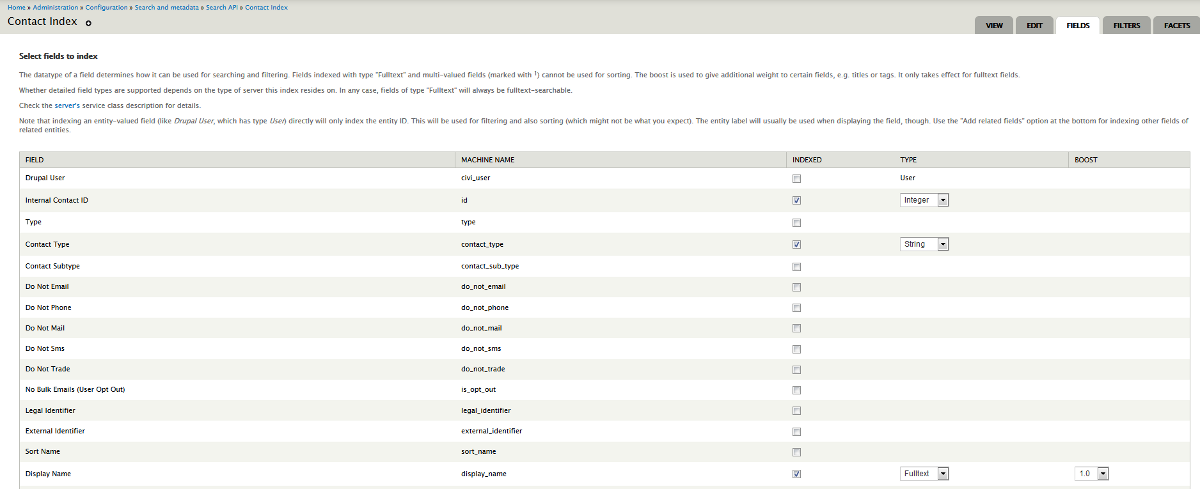
After you have created the Contact Index, the next step is to select which fields get indexed. You should be redirected to the fields tab for the index after its creation. If not, then edit the index and click the Fields tab.
In the field list you'll see all the properties for a CiviCRM contact. For this example, all you need to select is:
- Internal Contact ID, type Integer
- Contact Type, type String
- Display Name, type Fulltext
Including fields makes them available for filtering in the search View and Facet blocks.
Click "Save" after finishing configuration of the fields.
5. Configure Filters
After saving the fields the first time, you should be redirected to the Filters configuration page. If not, edit the index instance and click the Filters tab.
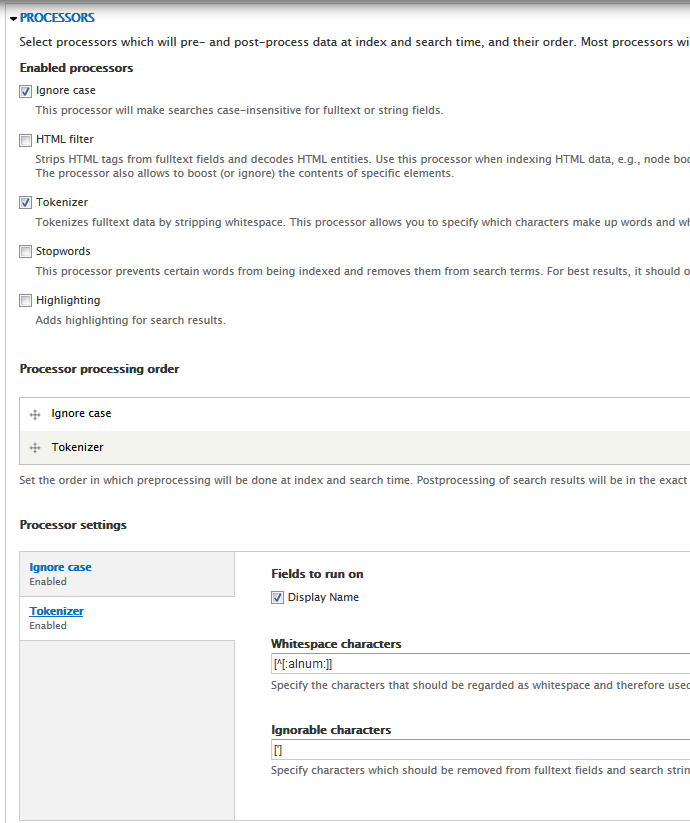
There are tons of options on the Filters page, broken up into two sections, Data Alterations and Processors
Data alterations include Heirarchical fields, Entity views, creating aggregate fields, and adding entity urls to the index. None of these options are necessary in this example.
There are several out of the box Processors including Ignore Case, HTML Filter, Tokenizer, Stopwords, and Highlighting.
In this example. enable the Ignore Case and Tokenizer processors. For each processor enable the Display Name for the "Fields to run on" option.
After configuring the processors, click the Save Configuration button.
6. Facets
After configuring the Filters page, click on the Facets tab to setup a Facet block. When enabling a field as a facet, a block will be made available on the Drupal blocks administration page.
Check the Contact Type item, and then click Save Configuration.
Next, click the link "configure display" for the Contact Type facet. There are lots of configuration options here. Feel free to play with these settings, but for this example select "Links with checkboxes" for the "Display widget" field.
Click the "Save and go back to realm" button.

7. Index the Contacts
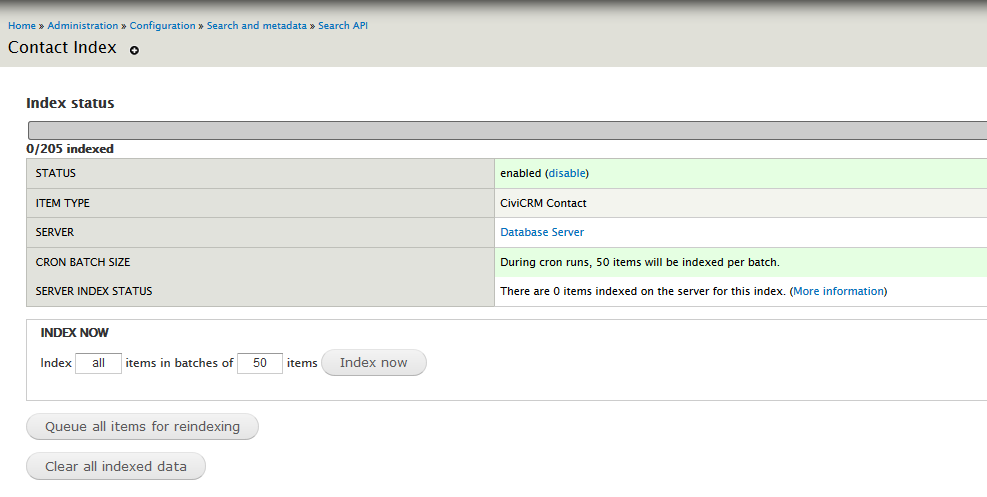
Click the View tab on the Contacts Index search tab list. From here you can click the "Index now" button to index all the contacts immediately. If you do not click that, the items will be indexed in batches during cron runs.
8. Create the Search View
After creating the Server and Contact Index instances, you're ready to build the View to provide the search listings and interface.
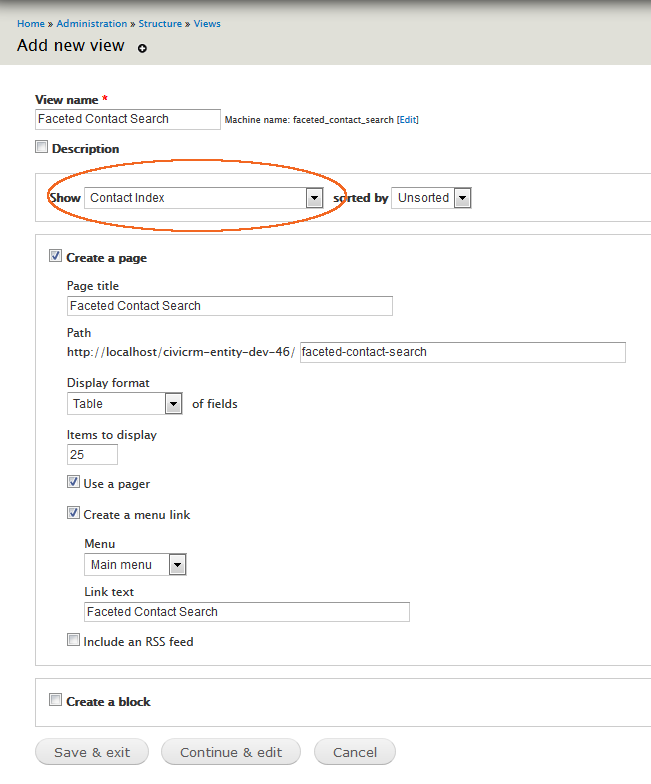
Create a new View in the standard way.
Give the view a name.
For the "Show" field, find the name of the index instance that was created: in this example "Contact Index"
Configure the rest of the initial View settings as you desire, but in this example, I'm enabling a Page display, showing 25 items with a pager, formatted in a table of fields.
After the initial configuration, click Continue and Edit.
9. Configure View Fields and Filters
I'm going to go out on a limb here and assume that you know how to add fields to a View. If not, then please review one of many of the Views tutorials on the web or YouTube.
Add the fields:
- Indexed CiviCRM Contact: Contact Type
- Indexed CiviCRM Contact: Display Name
Next add a filter:
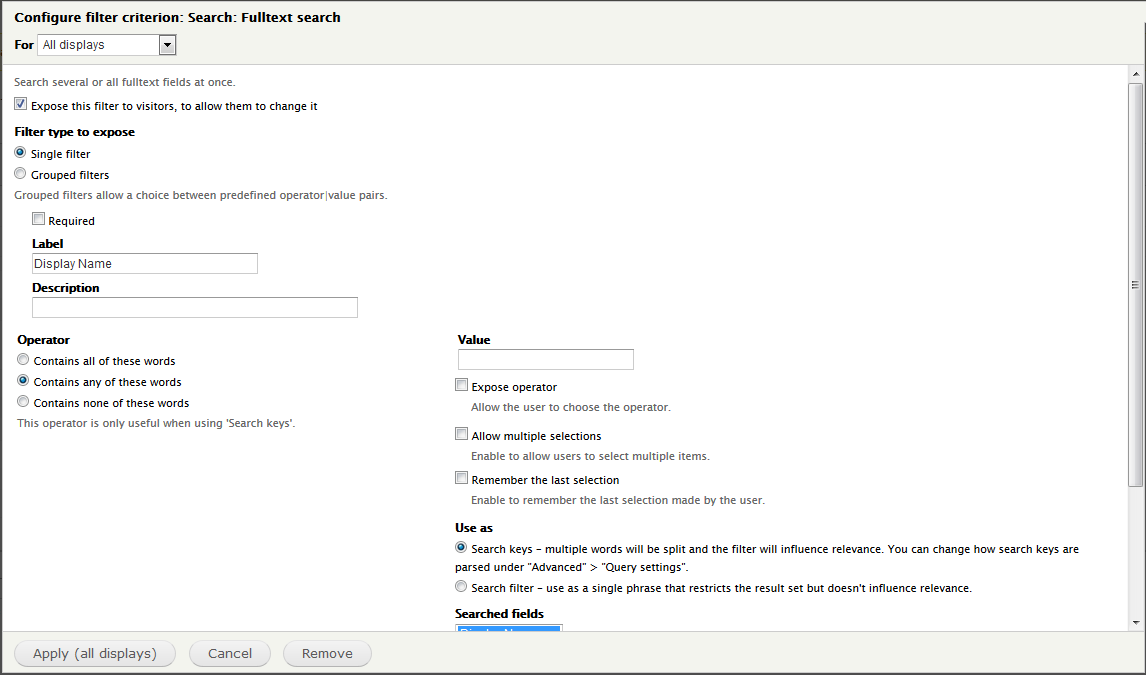
Search: Fulltext search
Expose the filter to users, and change the label to "Display Name", or "Search". This will be used for the user to be able to filter the list by display name.
Set the operator to "Contains any of these words"
For the "Use as" setting, select Search keys – multiple words will be split and the filter will influence relevance. You can change how search keys are parsed under "Advanced" > "Query settings".
After configuring the fields and filters, Save the View. Additional fields and filters can be added to suit your needs. Explore!
10. Contact Type Facet Block
The last bit of configuration for this feature set is to configure the Contact Type Facet block and set it to appear on the search page. When a facet is on the Contact Index Facet settings page, a block is automatically made available on the standard Block administration page.

Click configure in the block row.
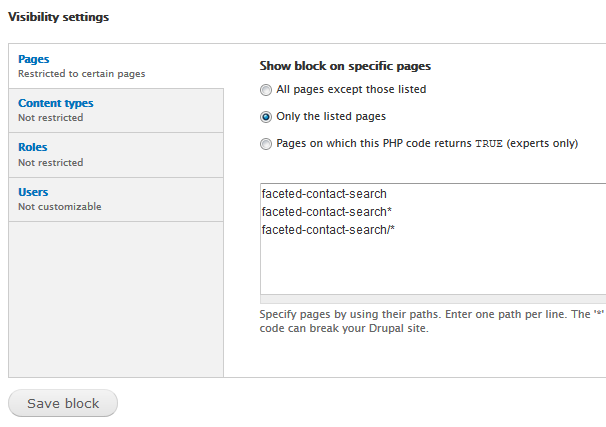
Configure the visibility settings, what pages you want the block to appear. In my example I set the block to appear in Bartik's Sidebar First region, but you can place it in any theme region you prefer.
In my example, the Drupal path to the contact search view is "faceted-contact-search". I want the block to appear only on that page, but because of the faceted filtering and Display name filters there will be url query elements.
Choose to show the block "Only on the listed pages" and include paths "faceted-contact-search" , "faceted-contact-search*", and "faceted-contact-search/*".
11. The Results
You should now see something similar on your new faceted contact search View page.
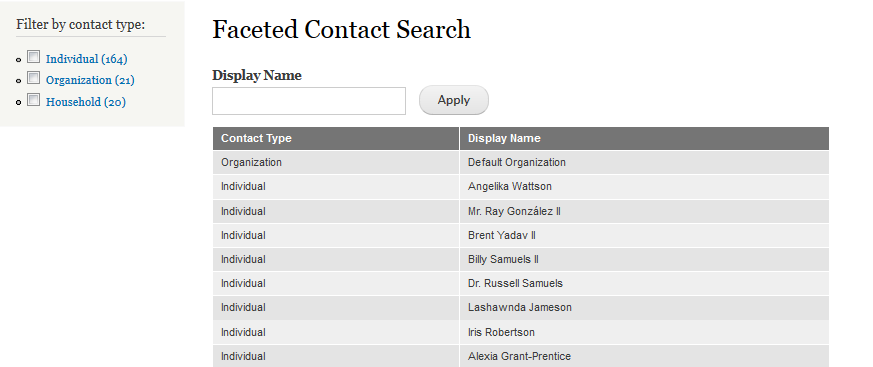
Facet blocks use Ajax, so when you click on one of the Contact Type checkboxes, the page will automatically refresh, showing only contacts with the Contact type selected. Uncheck the box to unfilter the result set.
Conclusion
You can have multiple facets per view, and using one of the many contrib modules that extend these modules, there is hardly a limit to what you can achieve. All of this can be achieved with zero additional code, pure site building. There is a strong developer api for customizing and extending this functionality even further.
Also, there are no CiviCRM permissions stopping users from visiting the view. You can control permissions with standard Views permissions. If you want to expose CiviCRM data to users, but not give those users any permission to access the CiviCRM backend, then it can be so. If your theme is responsive, then your search view can be, too.
This is a very simple example of what is possible, and I hope you can see the vast potential involved with these modules and techniques. Really the limit is your imagination.
Have fun building your own specific implementations!
Skvare is a leader in Drupal and CiviCRM integration. Contact us to get questions answered and for consultations to make the most of your Drupal and CiviCRM installation.